For some time now I was not entirely happy with how I am cooling my PC, my NAS and my server. It’s not that anything is terribly wrong, it’s just that I am aware that things can be better… So I said I have to fix this.
The easiest solution would be to find a decent fan controller, add it to each setup and I am good to go. But that’s easier said than done. For a while I couldn’t find a solution that has all the features that I need and that isn’t overpriced. So as you can guess, I decide to build my own.
And the best part is that the entire project is documented and released as open-source open-hardware project. So hopefully others that have same “problem” can use it or at least use it as starting point.
I have also added some cool features like expansion headers for attaching I2C and 1-Wire sensors. And the software provides a really nice GUI to control the fans, program custom profiles. Maybe the coolest part (if you are nerd like me) is that you can access it remotely and the software also has a built-in API that you can use to remotely and/or programmatically control all of your fans!
In this project we have built a Multifunctional Eink Gadget that can work as multiple different “things”. As an example we have implemented a 6, 12, 20 sided dice feature and also a simple hero dashboard. While this project is a very simple example on how you could use eink display in very low power application, you can easily take it as a starting point and expand it even further. The board also has a Bluetooth Low Energy capabilities, so it is possible to communicate with other devices and also integrate everything into a much bigger system.
Camera slider is a great tool that in the hands of a great video maker allows them to create amazing time-lapse videos, move the camera to follow the subject or move the camera around to highlight a fixed subject. Unfortunately, I am not a great video maker. However I am a maker and making my own camera slider sounds like a ton of fun! That is why I decided to make my own WiFi enabled camera slider. Using the 2020 Aluminium extrusion and few off-the-shelf components allows the camera slider to be as long or as short as we need it, while being very sturdy and also lightweight for carrying around or mounting on a tripod. We can then use built in WiFi connectivity to control and program the camera slider to have a very precise and repeatable camera movements.
In the past, I’ve used several filament dry boxes, but none of them had all the features that I wanted or even what I thought every filament dry box should have by default. So I decided to make my own. As always all the source files are available in case you decide to build one for yourself. But either way, you can watch the video and maybe pickup few ideas and improve on them. So, let’s make an awesome controller for 3D printing filament dry box!
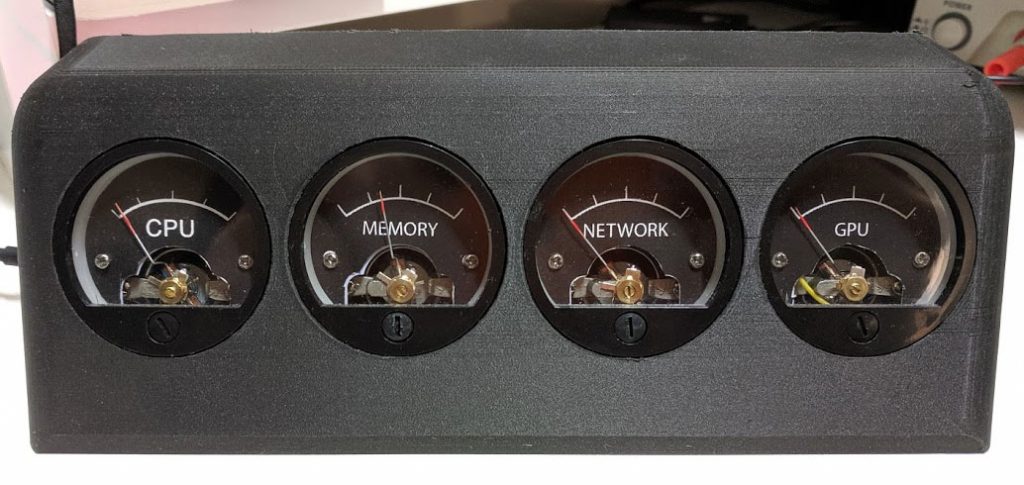
Resource monitor showing CPU, memory, network and GPU usage in real-time
See it in action
In the video above, you can see first a power up sequence where all four dials go from zero to 100% and back to zero after which they start showing real time CPU, Memory, Network and GPU usage. After that we run a internet speed test to show how the real-time information is displayed on the dials.
Project update
I am very pleased to announce that this project has turned into a product! Thanks to collaboration with Streacom, you can now purchase VU Dials.
It’s a bit hard to capture how this clock really looks, especially since my camera doesn’t really appreciate when there are sixty LEDs glowing into it. Trust me, it looks even cooler when you see it live.
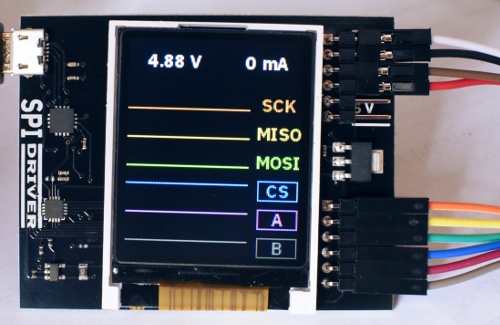
While ago I backed up a SPIDriver’s crowd supply campaign to make an open-source, open-hardware SPI tool. Even though I have plenty of professional tools to do this job, but at $30 it was worth buying this tool even if I never end up using it, right? Two weeks ago I received it in the mail and gave it a quick demo run; it looked great, worked as expected but I didn’t had a real chance to put it to the test. Last week there was an issue on the production line and few bricked units ended up on my table. Since I needed to extract data from the SPI Flash and analyze it, I though this was a perfect opportunity to put the SPIDriver to the test.
Making a IoT LED dimmer that you can control via your PC, phone, tablet or any other device connected to the network is super simple, and I’m going to show you how.
I’m sharing my three channel LED dimmer that you can use to dim single RGB LED strip or dim three separate LED channels. I want to be able to control lights above my desk and also mix warm white and cool white strip to give me more flexibility over lighting while I’m working, taking pictures or watching movies.
This is going to be a very short and very simple project that if you follow steps below, you can build it in an hour (excluding lead time for components).